Monday, July 21, 2014

July Creative Kit Tips and Techniques

This month I stretched myself to use some tools I've had in my possession and never tried;
chalk board paint and a chalk marker.  I used this months sketch from www.mycreativesketches.blogspot.com as my inspiration. 
 
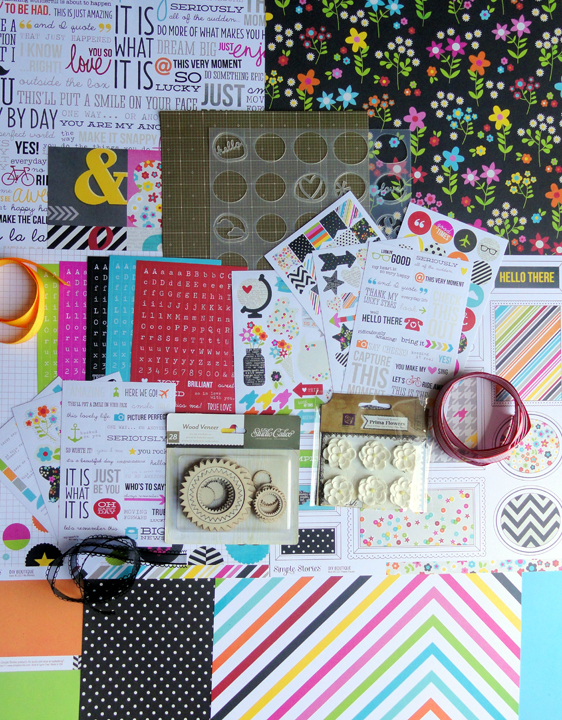
I used the stencil included in the Creative kit and painted the chalkboard paint using a sponge brush.  I let the paint dry well before proceeding. 

 
Next I used a piece of chalk to "chalk up" the circles then rubbed it off.  It helped make the chalkboard circles look more like a chalk board and less like black circles.  Lastly, I used my chalk pen to add some words and the hearts next to "Fabulous".  The chalk pen works so much better than using chalk.  It doesn't rub off like chalk does but it does rub a little to make sure it still looks like chalk.  Lastly, I used some cardstock circles and some fabulous pictures of my niece. 
I should also mention I took a fine tip pink journaling pen to the tips of the flower petals.  I am happy it came out so cute.
 
I wanted to give you a couple tips on the other layouts I made.
 
 
For this layout, I inked the wood circles with red and blue inks.  You may notice the words "Brother" and "Super Hero" are red with a black background.  I used random black letters from the sticker sheet (like Z and Q) first then topped it with the red letters.  I used the black letters not typically used so I wouldn't use up the more common letters I might need somewhere else. 


I was playing around with the wood pieces in the Creative kit and started putting them together.  Then I had a wonderful idea to use it in my layout.  I sampled different paints in my stash in an effort to match the colors in the paper as close as possible. 


 I painted each circle and let them dry before assembling my colorful embellishment.
I will also mention that when you create a two page layout you have to be a bit creative with the paper you use.  For this layout I only cut small strips of the striped paper for the top and bottom of each page rather than running an entire piece on the background.  If I hadn't done this, I wouldn't be able to create this layout. 


Here is another layout I had to use some creativity to accomplish the look.  I used one piece of paper for the background.  I sliced the paper and flipped the color side over to the front.  I grabbed some washi tape in my stash and taped the two parts of my paper together in the back.  Now I have a 12x12 layout which looks like it was created using two pieces of paper but really only used one.  As you know, I like to get a lot of layouts out of my MCS kits.  By using just one piece of paper for my background I was able to stretch my paper even further and make more layouts.


This is such a fabulous kit full of color.  Have fun Creating!
 
Joan


Monday, July 7, 2014

July My Creative Scrapbook Kit Reveal


It is time for the My Creative Scrapbook July kit reveal.  It is an amazing month of kits and layouts as always. 

This month the Main kit is packed full of My Minds Eye papers and embellishments, there is also a mask, and a mist. 


The Design team did some beautiful pages with the Limited Edition kit.  I would love to be able to create fancy pages like they do.  This months kit includes a mist, beautiful Prima papers, and some amazing embellishments. 


Another thing I wish I excelled in - making amazing Mini albums.  Doesn't Kristin deliver each month with her albums.  She is so creative.  This month she created with Simple Stories papers.  As always, this kit is jam packed full of goodies.


As always, I same my favorite for last.  I had a hard time getting started creating with this kit since there was so much black and white and not a true theme.  But, once I started going I loved it.  The colors allowed me to create some bring fun pages and the lack of a theme allowed me the freedom to use pictures I loved no matter what time of the year or no matter what event they were from.  You are sure to love this kit filled with Simple Stories and this month we even get a mask.  I've wanted one of those for so long!


Here are the layouts I made with this kit (I ran out of time or I would have made more).

I used my mask for this layout.  I also had a fun time backing some of the wood pieces with patterned paper to add some dimension to the layout. 
 
"You are spectacular" happens to be one of my favorite pages I just hope my son doesn't give me a hard time about it.  I had this cute photos of him with pink glasses so I had to use them - I've been waiting for the perfect opportunity!.  This time I added paper to the wood circles.  I just traced the shape on the paper and cut them out. 
 
"Sometimes being a brother is even better than being a super hero"
I love these photos of my boys.  When I started working with the paper I was going to cut out the frames.  Then I changed my mind and just cut out the centers of the frames and filled them with photos. 

Watch for a tutorial on this page to come later this month.  I used the mask again with some chalk board paint and chalk pen.  My niece is so cute!

"Seriously?  Snow in August, only in Colorado"
I really am almost finished scrapping last years vacation. LOL.  It was really more like sleet or something.  We were up in the mountains and the boys took a hike in the most beautiful area.  I laugh every time I look at this photos and the boys are wearing shorts and winter caps. 
 
Don't forget to check the design team gallery or more amazing layouts, www.mycreativescrapbook.com and the blog, www.mycreativescrapbook.blogspot.com daily for tutorials and creative tips.


Wednesday, July 2, 2014

My Creative Scrapbook July Sneak Peaks

It's July 1st! Are you excitedly anticipating the My Creative Scrapbook kit reveals? Make sure you check the website on the 5th, www.mycreativescrapbook.com for the reveal. For now, here is a sneak peak of what you can expect this month.

The Main Kit:


The Creative kit:


The Limited Edition kit:


Lastly, the Album kit:


Check back on the 5th for the full reveal.

Joan